How to vectorize hand-drawn artwork: scan, clean, trace, refine
How to vectorize hand-drawn artwork
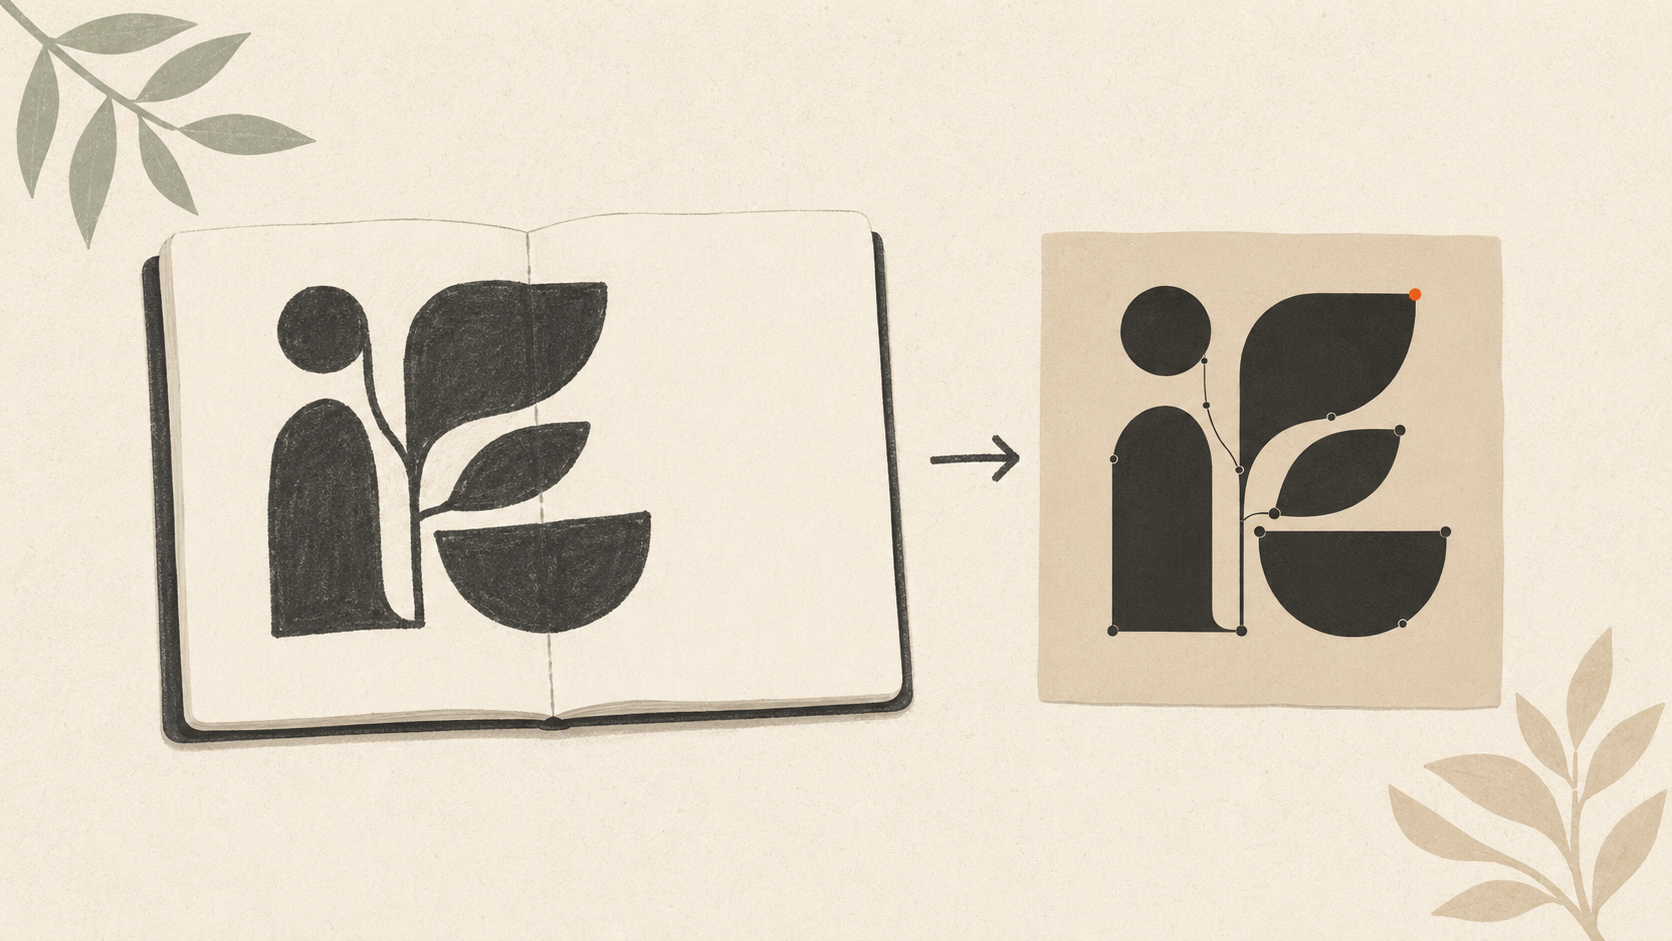
You sketched a logo. Or an illustration. Or a custom design for a one-off product. On paper, it looks great. But now you need it as a vector file — to print it, cut it, embroider it, or hand it to someone else for production.
Hand-drawn artwork has specific challenges that printed logos don't. The line weights vary. The ink bleeds. Paper texture shows up. Pencil grays where there should be solid black. Smudges along the edges.
Here's the full workflow for getting clean vector files from hand-drawn source material.
Why hand-drawn needs different handling
A printed digital logo is engineered for vectorization — solid colors, clean edges, mathematically perfect curves. Vector software handles it predictably.
Hand-drawn work has characteristics that fight the conversion:
- Variable line weights along a single stroke (pressure changes)
- Paper texture showing through as noise
- Imperfect curves that look intentional but trace as jittery
- Ink saturation differences (faint vs heavy areas of the same line)
- Smudges, eraser marks, paper folds
- Color variation in colored sketches
- Mixed media (pencil base, ink overlay, marker fill)
A clean vectorization workflow accounts for these. A poor one tries to ignore them and produces messy output.
Step 1: Scan or photograph the original
The vector trace can only work with what it sees. Better source = better vector.
Scanning (preferred)
If you have access to a flatbed scanner:
- Set resolution to 600 DPI minimum. 1200 DPI is better.
- Choose color mode: Color (for colored sketches) or Grayscale (for black-and-white work).
- Scan with the artwork flat against the glass.
- Save as PNG or TIFF — not JPG. Lossless formats preserve detail; JPG introduces compression artifacts that complicate vectorization.
Photographing (acceptable if scanning isn't possible)
Use the best camera you have (a recent phone is usually fine):
- Lay the artwork on a flat surface, preferably near a window for natural diffused light. Avoid direct sun (shadows) and overhead room lights (harsh contrast).
- Use a tripod or steady the phone against something solid. Camera shake softens edges.
- Position the camera directly above the artwork, parallel to the surface. Not at an angle.
- Crop to just the artwork before saving. Save in maximum quality.
- If your camera can save in RAW or PNG, use that. Otherwise use highest-quality JPG.
What good source looks like
- Sharp edges where the artwork has sharp edges
- Even lighting across the entire image
- No perspective distortion (the image is square, not trapezoidal)
- Resolution at least 2,000 pixels in the longer dimension
If your source is fuzzy, dark, or shadowed, vector conversion will struggle. Re-do the capture before proceeding.
Step 2: Clean up the source image
Even a good scan has stuff to clean before vectorizing. Paper texture, faint pencil marks, smudges around the artwork. These all become "noise" in the vector trace.
In Photoshop, Photopea (free, browser-based), or GIMP:
- Crop tight. Cut off the surrounding paper. Keep only the artwork.
- Adjust levels. Image → Adjustments → Levels (Photoshop). Pull the white slider in to brighten the background to pure white. Pull the black slider in to deepen the artwork to true black. The middle slider adjusts midtones — usually slide it toward black to deepen the artwork.
- Remove background. If your paper isn't pure white after levels adjustment, use the Magic Wand to select all white areas, then delete them. The artwork remains on a transparent background.
- Clean up artifacts. Use the eraser or clone stamp to remove smudges, eraser marks, paper folds, or stray marks that aren't part of the artwork.
- Convert to high contrast. For black-and-white work: Image → Mode → Grayscale, then adjust levels for pure black and pure white. For color work: keep RGB and adjust each color channel as needed.
- Save as PNG with transparency.
For cleaning up a low-resolution or damaged source more broadly, the same techniques apply but are more aggressive when starting from poor source material.
Step 3: Choose your vectorization method
Three approaches for hand-drawn work:
Method A: AI vectorization (fastest)
AI tools handle hand-drawn material in seconds. Some preserve the hand-drawn character (slight variation in line weights, organic curves) better than rigid auto-tracers from older software.
ArtworkUpgrade handles hand-drawn material in a single upload. The preview lets you see how the trace handles your specific drawing before paying. Outputs include SVG, PDF, EPS, AI, and DXF.
What works: Fast, affordable, preserves character on most hand-drawn work. What doesn't: Very fine detail in pencil work may simplify in ways you don't want. Heavy paper texture can be misread as part of the artwork.
Method B: Manual tracing in Illustrator
For full control over how your hand-drawn work translates to vector:
- Open Illustrator. File → Place → select your cleaned PNG.
- Lock the layer with the placed image (Layers panel → click lock icon).
- Create a new layer above.
- Use the Pen tool to trace the artwork manually. Or use Image Trace with custom settings.
For Image Trace with hand-drawn:
- Click the placed image. In top toolbar, click Image Trace.
- Click Image Trace Panel for full options.
- Try preset "Sketched Art" or "Black and White Logo."
- Adjust:
- Threshold: higher value catches more detail, lower simplifies
- Paths: higher value = smoother, fewer paths
- Corners: how aggressive corner detection is (lower for organic curves)
- Noise: higher value = filters out more small artifacts
- Click Expand to make the trace editable.
What works: Full control, ability to preserve specific aesthetic choices. What doesn't: Time-consuming. Requires Illustrator subscription. Steeper learning curve.
Method C: Hand-redrawing in vector software
For high-stakes work, redrawing the hand-drawn art from scratch in vector software gives the cleanest result. A designer (or you, if you have the skills) recreates the drawing using vector paths, possibly preserving the hand-drawn character intentionally.
This is overkill for most hand-drawn work but justified for:
- Brand-critical logos with hand-drawn elements
- Artwork that will be reproduced at very large size (signs, packaging)
- Custom illustrations for premium products
Cost: $100-$500+ depending on complexity. Time: a few days typically.
Step 4: Preserve hand-drawn character (or don't)
Decide what you want from the vectorization:
Preserve the hand-drawn look:
- Use AI vectorization with detail settings high
- Use Illustrator's "Sketched Art" preset
- Keep variable line weights when possible
- Accept some imperfection — that's the character
Clean up the hand-drawn look:
- Use lower-detail vectorization settings
- Smooth curves after tracing
- Apply uniform line weights
- Treat it as a logo design rather than artistic reproduction
This is a creative call. Most hand-drawn logos benefit from some cleanup but lose their soul if perfectly geometric. The middle ground — "tidy hand-drawn" — usually works.
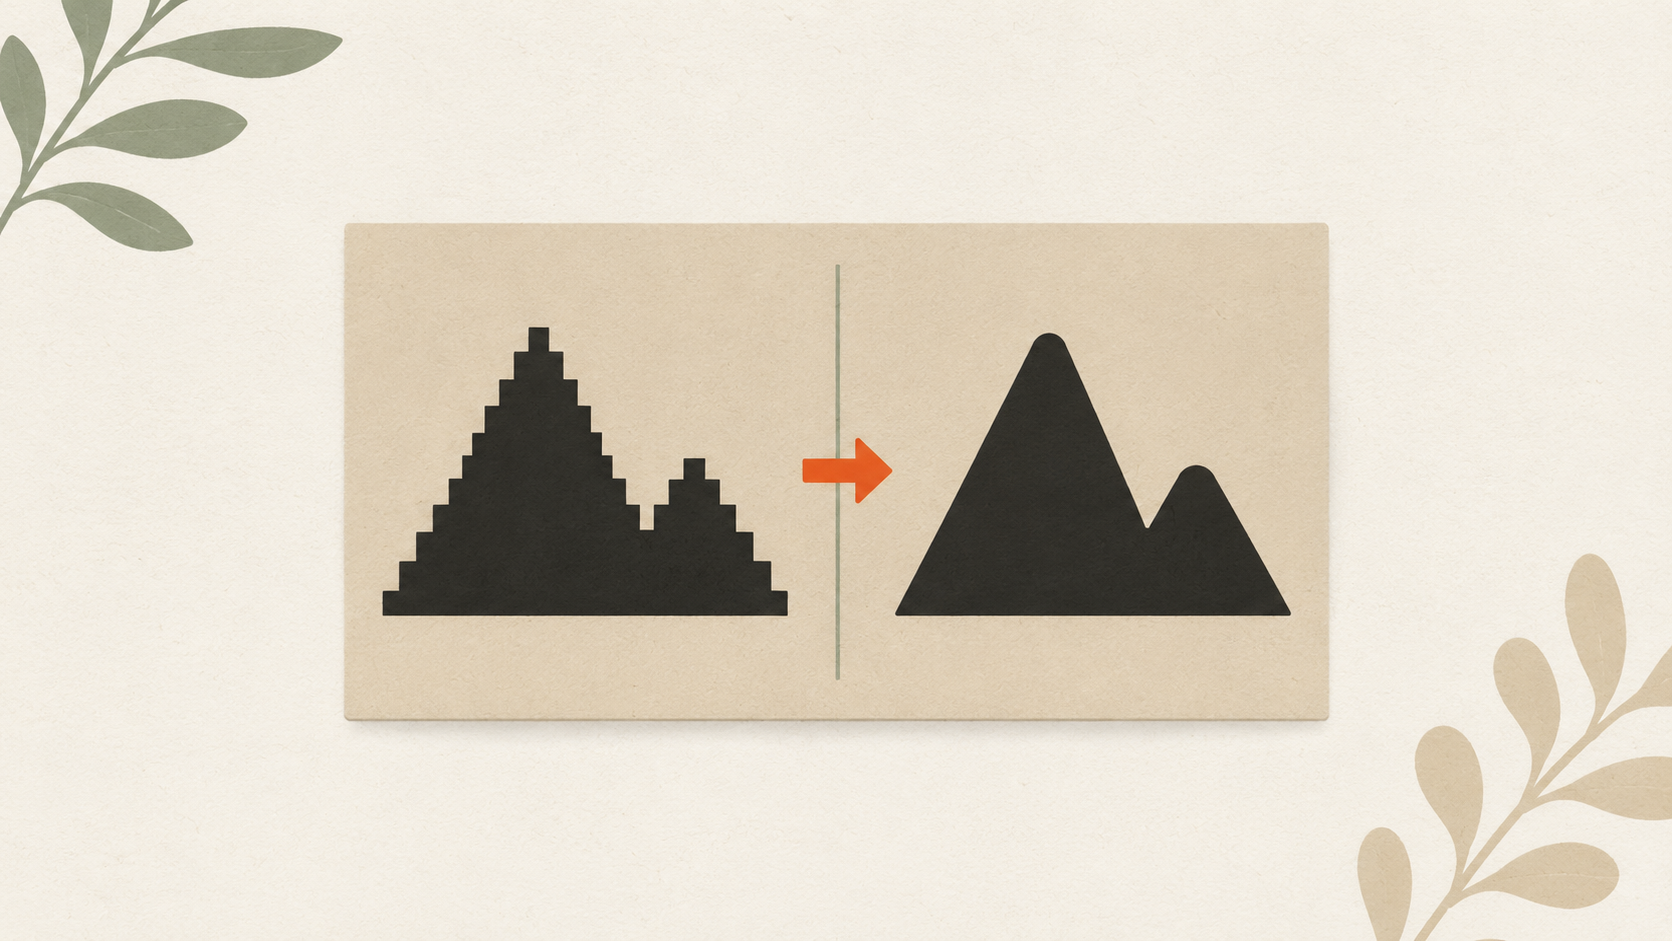
Step 5: Refine the output
After vectorization, the trace is rarely perfect. Common cleanup:
Excess anchor points. Auto-traces produce traces with way more points than needed. In Illustrator: Object → Path → Simplify. Adjust the slider until the path is smoother without losing the shape.
Stray paths or shapes. Tiny pieces of paper texture or smudges may have come through. Zoom in, find them, delete.
Open paths that should be closed. Vector software has Path → Join (or Ctrl/Cmd + J) to close paths. Useful when filling shapes that look open.
Color simplification. For colored hand-drawn work, the trace may pick up too many color variations. Use Object → Path → Outline Stroke and Pathfinder operations to consolidate colors.
Smoothing curves. Manually adjust anchor points to make curves more graceful. Or use Smooth tool in Illustrator (under the Pen tool group).
After refinement, save the vector file. Test by viewing at multiple sizes — does it look as intended at large size, at small size?
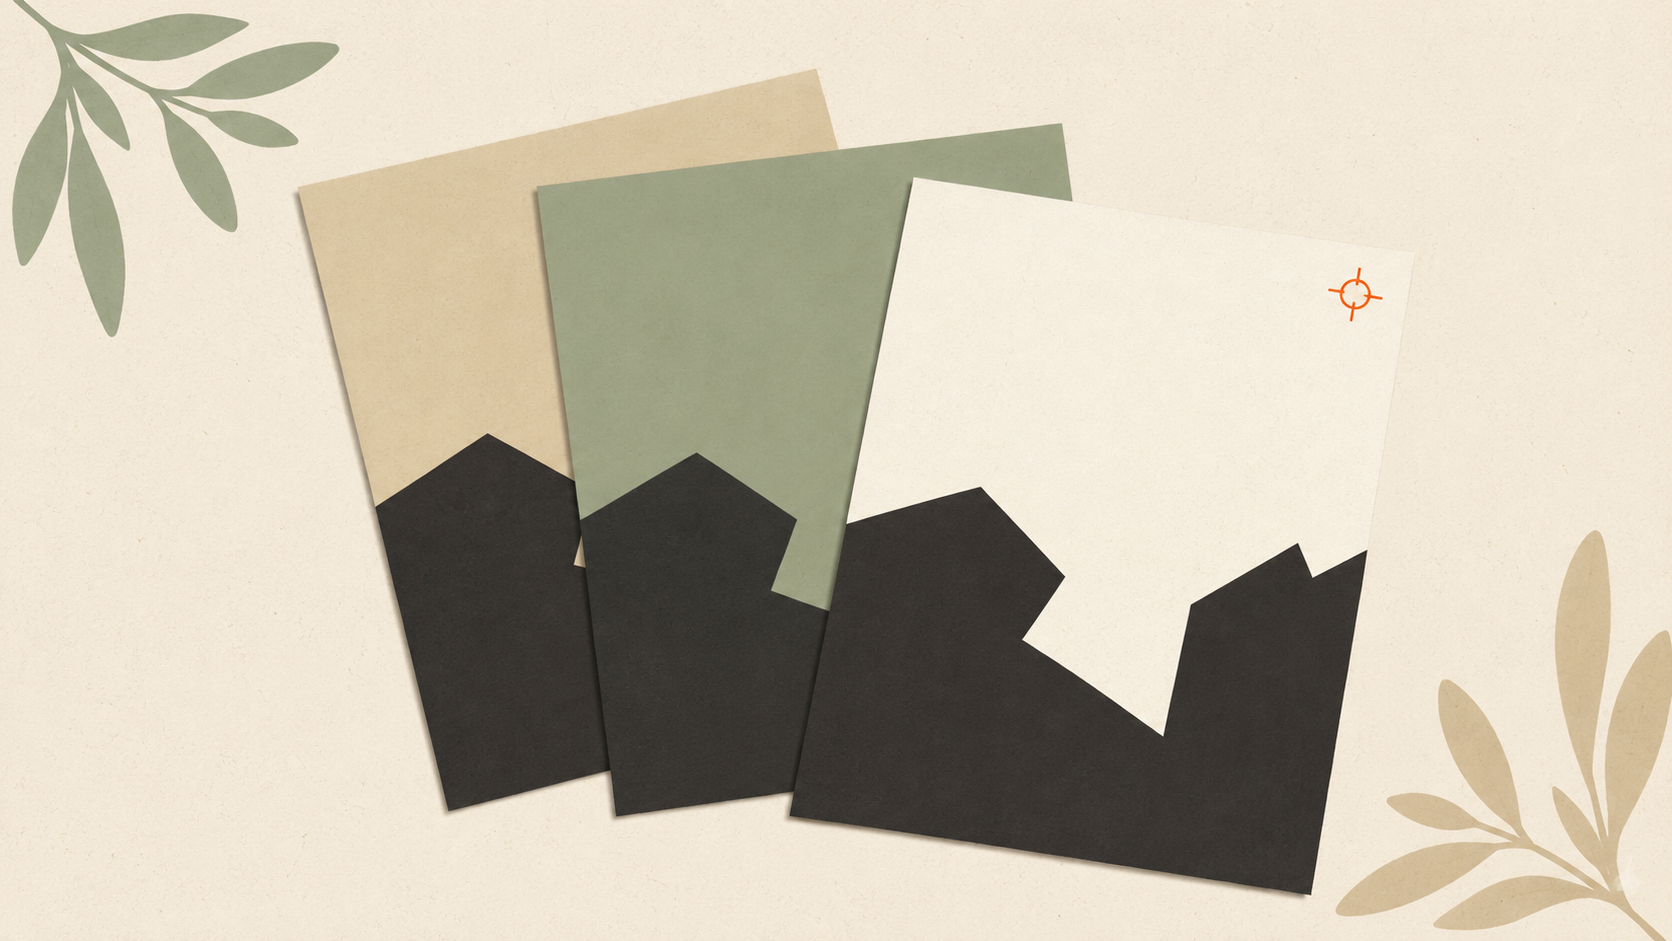
What to expect from different source materials
Black ink pen drawings: Trace cleanly. Often the best source material for vectorization.
Pencil drawings: Trace OK but pencil's gray midtones can confuse threshold-based tracing. Convert to high-contrast black-and-white before vectorizing.
Watercolor: Trace as gradients. Most vectorization simplifies watercolor to flat color regions. The result is more graphic than the original.
Charcoal or pastel: Heavy texture that vectorization tends to read as detail. Aggressive cleanup before tracing helps.
Marker work: Traces well if colors are saturated. May need color simplification.
Mixed media (pencil + ink + marker): Vectorize each medium separately if possible, or accept that the trace will simplify the layered effect.
When to use hand-drawn vectors
Hand-drawn vectors work great for:
- Logos with intentional handmade character
- Illustrations for packaging, apparel, or merchandise
- Custom commissions where the hand-drawn aesthetic is the point
- Embroidery designs where you want a less mechanical look
They work less well for:
- Tiny applications where hand-drawn variation becomes ambiguous (very small embroidery, fine vinyl cutting)
- Applications where pixel-perfect symmetry matters (icons, technical diagrams)
- Production at very large scale where line weight variations may look like printing errors
Common hand-drawn vectorization mistakes
Skipping the cleanup step. Trying to vectorize directly from a smartphone photo of a sketch. Always clean up the source first.
Over-tracing. Setting trace detail too high so every paper texture variation becomes a vector path. The result is messy and slow to render.
Under-tracing. Setting detail too low so important elements of the artwork disappear. Find the middle ground.
Wrong source approach. Drawing in pencil when you'll need to vectorize — pencil's grays cause issues. If you know you'll vectorize, use a black ink pen or marker for the final version.
Losing color information. Scanning colored work in grayscale by mistake. Always scan in color mode if your artwork is colored.
If you started with a poor JPG and need to convert it, the general conversion workflow applies but hand-drawn work usually responds better to specific hand-drawn vectorization techniques.
The takeaway
Hand-drawn vectorization is a four-step process: scan or photograph well, clean up the source, vectorize using your preferred method, and refine the output. AI vectorization handles most hand-drawn work in seconds. Manual tracing gives more control for high-stakes work. Hand-redrawing produces the best result when budget allows. Decide upfront whether to preserve the hand-drawn character or clean it up — both are valid choices for different applications.
Stop redrawing customer logos by hand
ArtworkUpgrade vectorizes any logo or design in 30 seconds. Free preview before you pay. $7 per design, all formats included.
Try free preview →More guides for How-To Tutorials
How to clean up a low-resolution logo: a practical workflow
Step-by-step guide to salvaging a low-resolution logo: assess the damage, reduce compression artifacts, upscale carefully, and vectorize for the permanent fix.
How to prepare your logo for an embroidery order: a checklist
What to send your embroiderer to get the best result: vector file formats, size and placement specs, color references, and how to handle it when you don't have vector files.
How to prepare a logo for screen printing: the customer guide
Step-by-step file preparation for screen printing: vector format, color separation, outlined text, Pantone references, line weights, and what to send the shop.